Saturday, December 1, 2012

DIY fabric-covered pencil tin

If you want to give your workspace or the kids’ craft table an instant lift, here’s a quick and easy project that even the older kids will be able to do themselves. These would also make a great gift for school teachers or grandparents.
 
Supplies:
1 empty food can (400g size), washed thoroughly, labels removed
Fabric of your choice (a 15cm cut or fat quarter will be ample)
Heavy fusible interfacing
Spray adhesive
Craft glue

 
Step 1: Make sure you are using a can with no sharp edges. Measure the height of your can (not including that little round lip on the top and bottom edge) and add 2cm (you will have a measurement of about 12.5cm).

Step 2: Next, mark out and cut (or cut using a rotary cutter and rule) a rectangle of interfacing that is 26cm wide x the height you measured in step 1 (12.5cm).


Step 3: Fuse your interfacing to your fabric, and if you have a directional print remember that the long sides of the interfacing will be the top and bottom of your can.
 

Step 4: Cut around the piece of interfacing.

 
Step 5: Using a piece of cardboard if you have one, mark a pencil line 1cm from the long edge of your card. This will form your pressing template. Starting on the two long sides, turn under and press a neat 1cm hem. Topstitch each of the long sides down, about 5mm in from the edge. If you don’t have a sewing machine, this could also be done by hand.

 
Step 6: Turn under ONE short end and press a 1cm hem. Top stitch as above. There is no need to hem the other short end. You should then having something that looks like this:

 
Step 7: Apply spray adhesive to the back of your fabric and starting with the raw end, carefully roll your fabric around the can. When you get to the hemmed end, apply a small amount of craft or hot glue and press down firmly.


HAVE FUN!


Sunday, November 11, 2012

First of the season

We picked out first basket of strawberries this afternoon. Those store-bought ones have nothing on these! Now... where's that bottle of bubbly?


Tuesday, October 9, 2012

Backyard farming

Spring is well and truly here in the Capital now, and we've been making the most of the warmer weather out in the garden.
We've built fences, pulled weeds, planted fruit trees, dug compost and planted, planted, planted our summer vegetable crop.
We've got corn, beans, peas, broccoli, silverbeet, cabbage, tomatoes, Chinese greens, lettuce, raddishes, potatoes, zucchini, pumpkins and cucumber all planted.
In the way of fruit, we've gone for strawberries (of course), watermelon, apples, pears, apricots and of course lemons. We already had a little plum tree and (what I think) is a kaffir lime.
That beautiful thyme you see below is an heirloom plant we dug from Clinton's Nanna's garden at Willowvale - I'd guess it could be 50 years old or more.


Do you like my French garden stakes? I picked up a set at an antique market in Nice during 2005 (the baggage check-in lady at the airport thought I was a bit nuts standing there at the check-in counter transferring them into my carry-on luggage to get my bag back under 32kg).


Pink lady apples are my favourite - I just have to keep those pesky parrots away!


The next job is a climber (probably passionfruit) to grow over and shade the chook-pen.


Our mini-orchard tucked away in the back corner. Can't wait to get some apricots off that tree!


And there's Charlie...
It makes me super-happy when I look around an imagine this place in another year or two!

Sunday, September 30, 2012

Crafternoon Tea

I am so happy right now.
It's spring. The Japanese maple trees are in full leaf. Our vegetable garden is thriving. The chickens are laying. Our house (now with a beautiful new kitchen) is feeling like a home.
I'm also happy because today we celebrated my baby girl's 6th birthday.


It was a Crafternoon Tea Party for a small group of eight friends. And what an afternoon it was!
We started with healthy snacks - fruit, vegetable sticks, iced fruit tea (pink of course) and homemade pikelets with sugar-free jam and cream.


By the time the last guest arrived, the girls were already asking: "When can we start the craft?" And so it began.


Project one was a colouring-in activity. I found a cute butterfly line drawing online and with a bit of Photoshop editing turned it into an image suitable to be printed onto fabric using the amazing US-based website Spoonflower.
My goal was to have the children colour in the butterfly using fabric markers (we found ours at Officeworks) and then mount it in an embroidery hoop (I used Birch bamboo hoops - available at Spotlight). And you know what - it went exactly to plan! If you're trying this project, when you're setting up your image file for Spoonflower, remember to leave enough white space around your artwork to fill the frame.
After a short break for swinging, party pies and pink milk (mini milk bottles and crates available from Little Toot Creations) it was on to project two - fabric covered buttons.


Each of the children received a little bag containing five sets of 28mm buttons and a button making template and tool (from Pack It In). I had pre-cut fabric circles from my (ridiculous) scrap stash and stocked up on hair elastics, which I popped into jars decorated with washi tape. And together with the mums (who I think enjoyed this project even more than the kids!) we made a whole bunch of pretty hair accessories.
We still had a little time, so using this printable I found at How About Orange we made some good old-fashioned Fortune Tellers (also called a Chatterbox).


Because the children are still early readers, I printed out a list of short, fun, phrases they could copy onto their fortune teller. If I had my time over, I'd have used ordinary paper instead of cardstock, as the folding was quite tricky!


And finally, it was time for cupcakes (cupcake teacups and recipe available from Little Toot Creations).


The kids had such a blast, and I was so thrilled that our party concept was embraced with such enthusiasm by our new school friends.
Special mention too, to Sparrow Bee Designs (Alice's skirt), Cassidy's Collection (Alice's lace headband) and Style Me Gorgeous (invitations and party printables). Oh, and my mate Jane for the Armenian Spice Cake recipe!

PS. Last week, while I was feeling a tad guilty about all the time and effort I was putting into this event, I happened to pick up the latest edition of LittleONE Kids magazine. Editor Amy Doak, in the publisher's letter, had this to say about the trend towards amazingly styled kids' rooms and parties:
"The parents we met loved doing their kids' room, or party. They didn't do it to impress anyone, they just did it because they wanted to. It made them happy."

And so, I am happy.

x Bec

Saturday, June 23, 2012

An egg is an egg is an egg

How many names can you find for an egg? Go on, I dare you. Bum nut? Cackleberry? Googie?


Do you remember earlier this year I wrote about my utter infatuation with my 5 new girls: Dot, Mildred, Petal, Rosie and Audrey? Well, today they finally came through for me! And not in a small way, either. You see, I gave up checking their laying boxes 2 weeks ago because they hadn't started laying by the time the weather turned cold (chooks usually go off the lay in winter). But today, to our surprise, we went into to change their straw and found not 2, not 5, but 18 EGGS! To say I was thrilled is an understatement!

Lucy, our 3-year-old, came running inside to declare that the girls had laid their first eggs. So out I went with an egg carton - kindly given by our neighbour Patricia, who takes great interest in our girls. Excited, but somewhat distracted by my dutiful washing and refilling of their water trough, I almost fell over when Clinton sent me back inside for a second carton! Yes, in 2 weeks and without our knowledge, our girls had laid a dozen-and-a-half perfect white eggs.


Alice, our 5-year-old, thought it was the best day ever! She cradled those precious parcels as if they were gold and thanked the girls for their hard work.

But what does one do with 18 eggs, in addition to the 12 store-bought ones already in the fridge? I'm planning pie, of course. Lemon meringue pie. With the fresh lemons from our little tree.


It's been a while since we harvested anything from home - setting up a vegetable garden going into a Canberra winter just didn't seem to make sense - so it felt really nice to go back to 'gathering' today. And if you're nice, I might even share tomorrow's baking with you. Maybe.

Thursday, May 31, 2012

Small opportunities

It's been far too long between posts but I am still here, and I am still chugging along.
For some time now there's been something niggling inside my head, and inside my heart.
As you would know, Little Toot Creations stopped being a hobby and became a job for me a couple of years ago now. It's become my third baby. It's always there - my sewing room door, and the computer, is always open.
Like in every small business, every week is different. Demand for my products comes and goes. Some weeks it doesn't rain, but it pours. However during the past 12 months or so it seems that making a sale has become really hard work. Facebook is still a great marketing tool, but it isn't yielding the results it once did. I can count on one hand the number of sales I've made through my madeit.com.au store this year.
To be honest, I'm growing tired of the 'hard sell'. I miss the days when people just loved my products, and wanted to buy them.
Of course, competition in the handmade industry is fierce these days. It's nothing for a hobby seller to undercut businesses like Little Toot Creations by 10, 20, even 30% on very similar products. The choice is endless. And although people are still buying, the whole marketplace has slowed significantly.
I love sewing. I love interacting with my (fantastic) customers. And I am oh so proud of my achievements.
But a few months ago now my little 5-year-old relayed to me a conversation she'd had with the mother of a very dear friend of mine. I'm not quite sure how the conversation came about, but I will never forget what Alice told her: "My mummy doesn't play with us. All she does is sew and work on her computer." It broke my heart.
And ever since, the mummy guilt has been terrible, and I've struggled to find my 'sewjo'.
So when the opportunity came up this week for me to step away from the computer, and away from the sewing machine, and get back out into the workforce, I took it.
Starting next week I'll be working part-time as shopgirl at a cute little children's boutique in the heart of Canberra.
I don't know yet what that means for Little Toot Creations. My intention is to keep the business running, and to sew again in the evenings (something I gave up when my husband finished studying late last year), but you may not see or hear as much from me online as you usually would.
I wasn't going to make any sort of announcement, but I saw this quote posted on Facebook this morning, and I inspired me to share:

Sunday, February 19, 2012

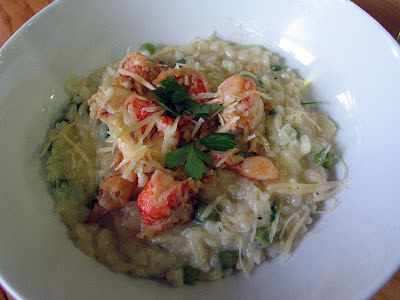
Creamy garlic yabby risotto

We're blessed, now that we're back in Canberra, to be within day-trip distance to my husband's family farm - which is located at Yalbraith, in NSW.
With so much work on at the moment, I was really pleased when on Thursday afternoon Clinton announced he was going to take the girls for a trip to the farm on Friday night and Saturday.
Heaven! A night alone in front of the TV (and Facebook - Little Toot Creations raised almost $1000 for the Centre for Newborn Care) followed by a whole day of uninterrupted sewing!
But I digress.
When they arrived home on Saturday afternoon Clinton and the girls were so excited to announce they'd been 'yabbying' and had brought home dinner. They had 17 of these little fellas...
So, what does one create with a bucketful of yabbies?
Well, I decided on a creamy garlic yabby risotto, loosely based on this recipe from Best Recipes.
Creamy Garlic Yabby Risotto
Ingredients
2 tbsp olive oil
1 onion, chopped
4 cloves garlic, crushed
1 tsp mustard powder
1 1/2 cups arborio rice
3 cups hot chicken stock
1 cup white wine
1 cup peas (we were lucky to have fresh but frozen will do)
Cracked black pepper
Chopped parsley
50g butter
80ml cream
20 freshwater yabbies
Shaved parmesan, to serve
I was lucky to have yabbies that had already been cooked (but otherwise just pop them into boiling water for a few minutes). Remove the flesh from within the shells (a hammer came in handy for this job).
While Clinton worked on the yabbies, I prepared the risotto. Brown your onion and garlic in a little oil in a heavy-based pan. Add mustard powder and rice and stir to coat. Gradually add your chicken stock a ladel at a time until absorbed. Do the same with your white wine. We added our peas along with the stock, as they were fresh and needed extra cooking.
If your rice is still a little firm, add some more liquid.
Once cooked, stir through your butter, cream, parsley and cracked pepper.
Finally, heat a little oil in a separate pan and fry off your yabby meat until heated and a little bit coloured.
Serve your risotto with yabby meat on top and a sprinkle of parmesan.
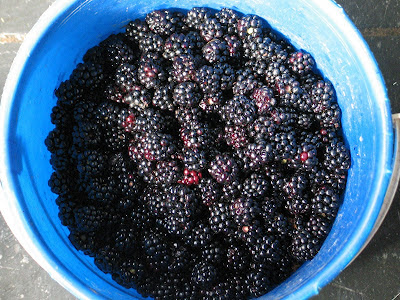
And for dessert... we had fresh-picked blackberries and icecream.

Saturday, January 7, 2012

Two good birds

Alright. This is a bit embarrassing. But I spent a whole 20 minutes today perving on two good birds.
They’re names were Dot and Mildred. And they were quite happy to strut their stuff while I sat and sipped on my glass of vino.

I’ve always wanted chooks. Fresh eggs for breakfast. And someone to recycle the food scraps and all the old bits from the vegie garden. But I never realised how relaxing it could be just sitting and watching them scratch around the ground. I do think I am in love. They're only eight weeks old right now, so we still have a few months to wait until they're ready to lay, but I know these girls and I are going to be the best of friends.

The kids on the other hand, well, it’s all hands on with them. They’ve named their three chicks Rosie, Petal and Audrey. While Dot and Mildred are pure bred Speckled Sussex layers and likely to be a bit hoity-toity, the little Pekin Bantam girls just love to be cuddled. They’re so cute – I just pray that some of their docile nature rubs off on Alice and Lucy!


I’ve thrown in a few pics of our new garden too – just because I can!


1.
Pin It